ID: Silhouette Postage Easel Card Tutorial

Created: Aug 14, 2015
Modified:

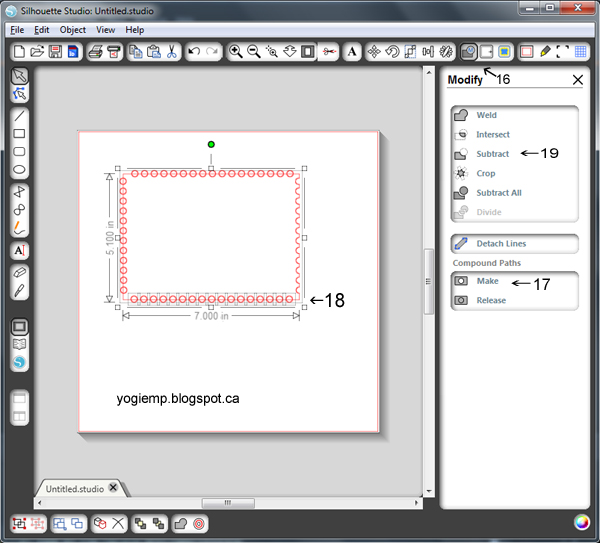
I signed up for another online class by Jennifer McGuire "A Cut Above"- this one, dies and Silhouette. You can take only the die portion or only the Silhouette portion or all of it... I signed up for all of it. I must admit the die portion didn't have anything I have not tried, but I'm glad I have access to it anyway. I've been very frustrated with my Silhouette software and have been using Sure Cuts A Lot which I am totally happy with and it's so easy to use... But in taking this class I learnt something I'm not able to do (at least that I'm aware of) with my SCAL software. 

You can see the instructions for the card itself by clicking HERE


after opening you Silhouette software (the free version)

1) Click on the rectangle icon and draw a rectangle on your mat.

2) Click n the pointer/selector icon and then on the any part of the red line around your rectangle.

3) click on the "Scale Window Icon"

4) enter your dimensions in the appropriate boxes. My card is 7"w x 5"h. (you can make it any dimension you normally use) Then click on apply.

5) Click on the circle icon and draw a circle.

6) Click on the selector icon

7) click on the "Scale Window icon".

8) size your circle. I used .25 but you can make it any size you want.

click apply, then move the circle so it is approx half way over the rectangle line or a little below it and starts approx where you will want the first scallop of your postage to start.

9) Click on the "Replicate window icon"

10) Click on either Row of 3 or Row of 4 repeatedly until you get enough circles in a line (you can add or subtract circle later if needed)

11) When you've entered as many circle as you think you'll need, move the last circle to where you want the last scallop to end.

12) Using the selector tool, select to row of circles being careful not to select the rectangle.

13) Click on "Align Window icon"

14) Click on the space horizontally - and watch the circle move...

PS you can do all these steps in a vertical position as well depending on where you want your scallops to be.

15) Again using the selector tool, select a row of circles only and copy and paste it, then move that row to the bottom of your rectangle, placing the circles at about the half way point of the circle. Similar to what you did on the top.

Paste the row again, and this time rotate it so it is vertical. Put it in place along one side of your rectangle. Deselect the circles, the reselect the extra circles and delete them. 

Select the vertical row of circles, copy and paste it and move it to the other side of the rectangle. 

You should have something that looks like this now.

16) Make sure everything is deselected. Click on "Modify" icon.

17) click on "Make" 

18) using the selector tool, select a row or column of circles, then while holding the CTRL key down on your keypad, click on one of the solid straight lines of your rectangle to select it as well. You can repeat this procedure to do the other 3 sides. OR

Select a row or column of circles, work the selection tool into the rectangle which will become highlighted, and continue dragging your circle selection to the other side of your rectangle. You'll notice a dash lined rectangle going over you the lines of your selected rectangle. This will do all the circles at one time.

19) click on "Subtract" and watch parts of the circles disappear...

19a) Select your finished postage design, copy and paste it and push it of your mat. This will be your front piece.

20) Go through the steps 1 through 4 to create a 2nd rectangle the same size you started with.

Move it up to and align it with the scalloped edge, overlapping it a scant amount.

21) Using your selection tool, select both the scalloped and the new rectangle and click on the "Weld" icon.


Your weld tool will remove some of the solid lines between your rectangle. If it doesn't look like this, you will probably need to move your rectangle a bit more in to the scalloped design and try the welding steps again.

Make sure you move everything else off your mat you don't want cut.

Send to your cutter.


Score along the line of the half moon shapes. This would give you a basic side or top folded postage card.

To make the easel card: score the scalloped piece along the horizontal mid point. In my case that's at the 2.5" mark.

Cut the scalloped piece you placed off your mat and match it up to your folded down front lip. After decorating it, adhere it to the folded front edge.

Decorate the floor and then add whatever you'd like to act as a stopper - buttons, rhinestones. 3D taped item, or like I did with a stamped image, fussy cutting around it and adding a couple lips to adhere to the floor.

Please use your back button for previous pages or should you wish to go to the Nitty Gritty Gallery please click on

or go to Misc Challenge 2015 Gallery
HERE

or to go to the previous Misc Challenges Card Gallery click HERE

or  And More Gallery for hand made greeting cards please click the link below.

More Cards Gallery


Home Page Index
(text only)
Glass
Gallery
"And More"
Gallery