Hand Made Ruling Pens

Created: November 17, 2009
Modified:

Someone asked me if I had any instructions on making a ruling pen from a coke can. I did, so I gather my info and created this page. I hope you find it useful. The instructions for the Cola Can nib comes from a handout written by Bill Hildebrault from Letterforum 1995. The yogurt nib comes from a handout by Peggy Robinson.


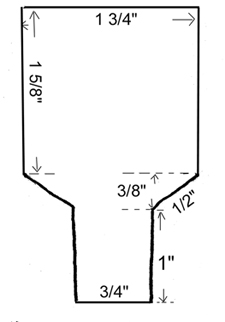
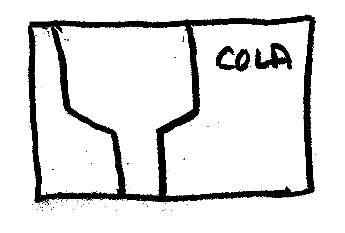
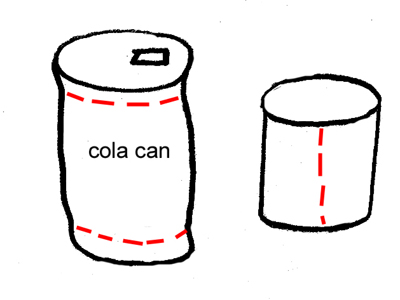
Clean a cola can really well. Cut along dotted lines to separate the lid and bottom of the can. Then cut vertically to create a flat piece of metal.

Careful, the metal is SHARP

Flatten metal against a smooth table edge. Like you would a curled piece of cardstock. Just moving it back and forth against the edge.

Now in theory the image at right should print out to the size you need. But just in case it doesn't there are all kinds of measurements on it to create your own template.

Create a template from some light weight cardstock.

Orient your template on the cola metal as shown at right. Tape down.

Note: Not absolutely necessary, but helps alleviate stress on the blade. Punch a small hole where the narrow shaft meets the angle of the nib. Right in the corner on each side.

Now cut out your shape using snips or other metal scissors.

Cut a 3/8" diameter dowel to approx 6" long

Wrap cut out shape around the dowel and tape securely.

Anneal the blade , using a match flame. (heat about 1/8" of the nib tip area until it turns color. Cool and wipe off soot).

Form blade by gently pinching, starting at handle and working toward blade tip.


Cut blade to shape with snips, starting at the tip. The beginning angle should be around 60º. Hold blade pinched together so both sides are cut together. You might like to make a pattern first or use a sharpie to draw your line on the blade.

Gently smooth the cut edges with #600 sandpaper so the pen rides smoothly on the paper.

Form blade as required to control ink feed. The pen is best filled with a small brush.


Yogurt or cottage cheese ruling pen nib.

This nib is basically the same except for the annealing. Cut out a flat piece of plastic from one of the containers. Create the above template shape, tape to plastic and cut out. Wrap around a dowel, tape to dowel, and cut the angle shape. Put a couple staples close to the outside edge to hold the plastic together. Now play. Try making them with different angles and shapes.
 

Return to  NittyGritty  Gallery


Home Page Index
(text only)
Glass
Gallery
"And More"
Gallery