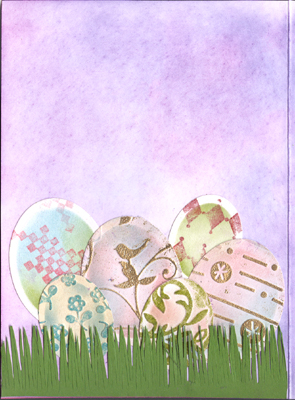
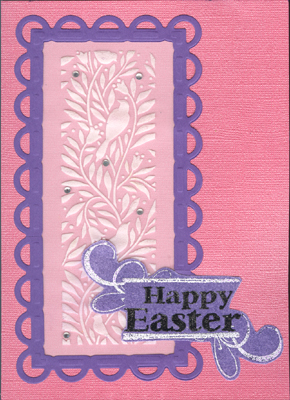
ID: DT March 2010 Happy Easter Card
Closed: 5"w x 7"h
 

Created: February 27, 2010
Modified:

SUPPLIES: (Note: most of the supplies can be found online at QuietfireDesign.ca (items in Pink)
 

White cardstock (for main card) & another small piece
Ba
zzill 
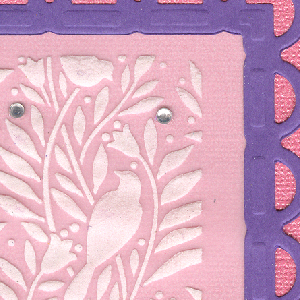
Bling cardstock pink
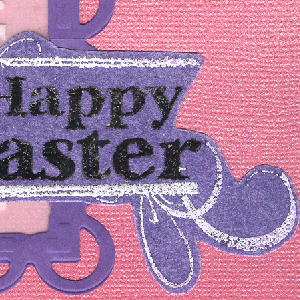
Purple cardstock
Vellum translucent
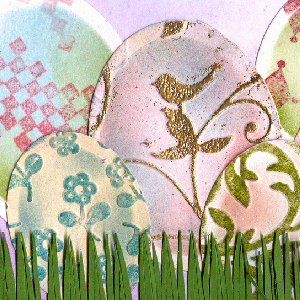
Green cardstock (for grass)
Tracing Paper (very small piece for mask)
Stencil Dreamweaver Birds & Branches #LL526
Dreamweaver white paste
Palette Knife
Spellbinders Frameabilities Scalloped Edge Frame #S5-011

Die cutting/embossing machine
computer Generated words Happy Easter (Heather font)
Rubber Stamps: Large Flourish, Small Harlequin Border, Checkerboard Corner
Perfect medium stamp pad
Embossing Powder 
White
Pan Pastels (purple, magenta)

Mini Faux Rhinestones adhesive backed or adhere with Glossy Accents

For the eggs:
Spellbinders Nestabilities Ovals Large
Cuttlebug or Sizzix Embossing Folders: various patterns. I used
Sizzix Lines & Circles set #655837 & Flowers set# 655838;
Cuttlebug Birds & Swirls #37-1609 & Victoria #37-1916
Rubber Brayer
Distress Stamp pads: various colors
Embossing powder:
Clear, Queen's Gold
Sponging tool


Xacto knife
Masking or Painters tape

Glue stick &/or double sided tape
Aleene's tacky white glue (or other PVA glue)
Glossy Accents
Heat Gun
Scor-It


Tape a piece of vellum down to a firm surface that can be moved out of the way to dry. Tape your stencil in place on all 4 sides on top of the vellum. Skim your palette knife over the surface with the white paste, removing excess from the stencil. Carefully remove tape from 3 sides, then lift stencil up and remove stencil and last piece of tape from vellum, clean stencil immediately. When dry, cut down to approx 2.5 x 5.75" or a touch larger - you can always trim down as needed, and make sure your design is centered.

Using the frame die, cut it out and put it through the machine again to emboss. Repeat this for a second frame. Since this frame isn't large enough for our stencil design, you will be splicing it to fit. (you probably can't see the splice in that close up??)

Lay one frame on top of the other moving one of them to the side till you have an opening width of 2.25 (should have 3 loops and 2 corner loops along the top). With an xacto knife, cut straight down through both layers, in a section where two loops join. This will give you an exact splice. Cut a small piece of tape and place it on the back of one section, butt up the other section and press down to tape them together. You should not see where the splice happened unless you look with a magnifying glass. Do the same on the bottom. Then do the sides. The opening height should be 5.5" and should have 8 loops and 2 corner loops along the side.

Trim the vellum down if needed and adhere to back with a thin bead of Glossy Accents.


I colored a piece of white cardstock with the purple Pan Pastels (you can just use another piece of the purple cardstock instead). I like using the Pastels, because they act as an anti static for the embossing powder. I then printed my words onto this. Made a small rectangular mask from the tracing paper to cover the words and stamped the Large Flourish at an angle so it would protrude on both corners, with perfect medium and embossed with the white embossing powder. Used the straight edge from a stamp laying on my desk to create the horizontal lines. Just put the ink right on the corner, tapped it down in the area I wanted, did this a couple times to get a slightly thicker line, and embossed with the white. You can see a couple narrow gaps where I stamped the lines. That's ok, adds interest. Cut out around the flourish and words leaving a small purple border.

Score and fold white cardstock. Adhere the Bling pink edge to edge. Trim neatly. Adhere the frame artwork. Overlay and adhere the flourish frame/words as shown on card. Adhere faux rhinestones either as adhesive backed or with a dab of Glossy Accents. Let dry if necessary.


INSIDE:

Using the 2nd & 3rd small oval dies, die cut 3 large and 3 small eggs from white cardstock, then use the die as a stencil and color tint the eggs, sponging them with various Distress colors. Run some of them through the machine again in an embossing folder. NOTE: Make sure the Distress inks are dry, prior brayering the high points. Brayer high points with perfect medium and thermal emboss with gold, or brayer with a colored pad and thermal emboss with clear.

For the others, rubber stamp with the Harlequin stamp or the Checkered Corner stamp using Aged Mahogany and clear embossing.

Make the grass by cutting a strip of green cardstock approx 5" w x 1.25"h and slivering your cuts to points to mimic grass, leaving about .25" as a bottom border.

Sponge the inside of the card with the Pan Pastels, purple and the magenta, blending well so none comes off on your finger when rubbed over it. OK, maybe a miniscule amount still will.

Adhere the grass, using the white glue along the bottom edge only, leaving the grass sprigs free. Adhere the eggs in a pleasing arrangement under the grass.

Return to  NittyGritty  Gallery


Home Page Index
(text only)
Glass
Gallery
"And More"
Gallery