ID: DT Mar/15 - Thanks Embossed - There is Always card
size: 7"w x 5"h

ID: DT Mar/15 - Thanks Die cards
size: 5.25"w x 5.25"h (card closed)

Created: January 28, 2015
Modified:

Suzanne from Quietfire Design came out with her first batch of dies - I'm using the "Thanks" die today. PS there is more to dies than just die cutting...

And on the inside a quote stamp (There is Always... from the "Give Thanks" 2 pce set)


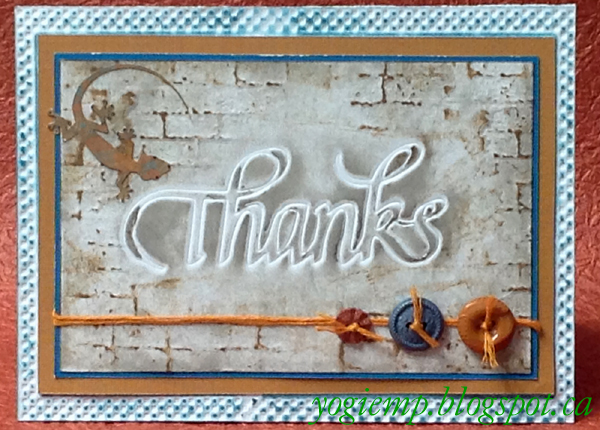
I dry embossed the thanks onto 110# white cardstock using the Spellbinders tan mat - careful, don't use too much pressure... Trimmed it down to size, then hit the high points direct to paper with Distress "Pumice Stone".

Dry embossed the brickwork (Sizzix Tim's "Bricked"), only partially running it through my machine. Hit the high points again direct to paper with "Brushed Corduroy". Adhered to a blue cardstock and used my layering ruler set to trim 1/16". Wrapped some orange string around the 2 layers and then adhered to a tan cardstock. Again used the layering ruler and trimmed 1/4".

Dry embossed the checked design (Spellbinders "Gold Rectangles 1" set), adhered my thanks layers and trimmed down then adhered all this to my white top folded card.

Adhered some masculine buttons, tying them with some of the orange string then using a hot glue gun.

A final touch was to add the little lizzard. An image I found on line and eCut, painted with Distress acrylics and added some black dots for eyes.
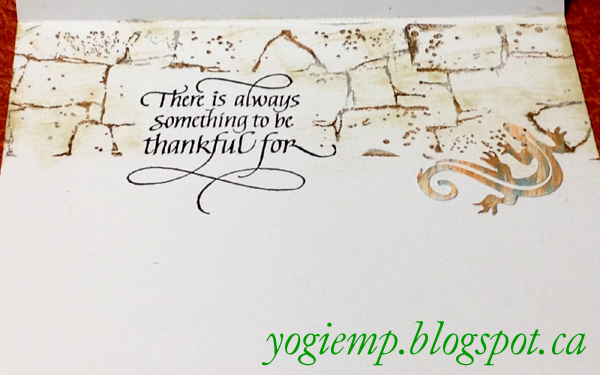
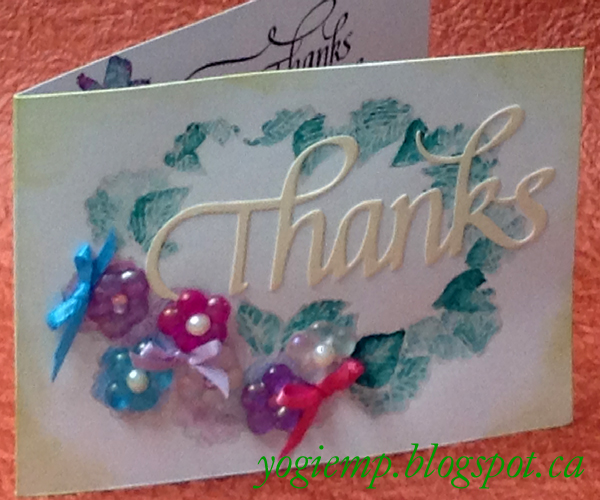
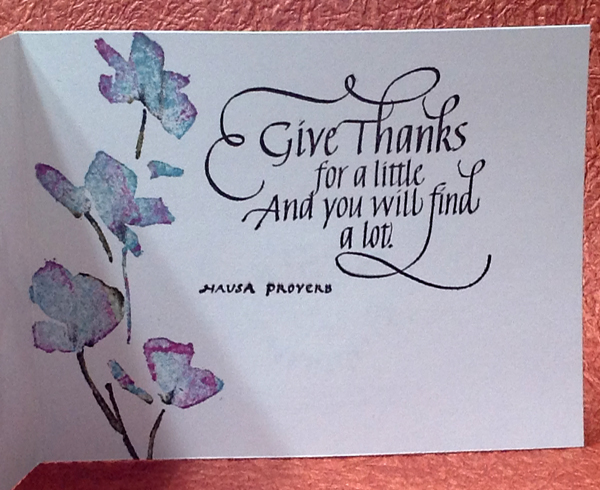
inside

On the inside stamped the quote using Versafine Black Onyx and clear embossed. Cut a mask and stamped the brickwork (Kaiser Craft) inking with Distress mini pads ("Pumice Stone", then here and there with the burlap, misting with water prior stamping. Swiped "Antique Linen" over the whole design.

I had cut a 2nd lizard, painted with Distress in orange and blue and adhered it.

ID: DT Mar/15 - Thanks - Give Thanks card
size: 5.5"w x 4.25"h

inside


Side folded my white card. Die cut the "Thanks" from cream cardstock.

Stamped the leafy frame (Creative Expressions "Cabbage Rose Frame") using distress greens, misting with water prior stamping. Adhered the thanks.

Adhered the flower baubles that I made...

FLOWER BAUBLES:
Using Michael's plastic beads. Warm toaster oven to 300ºF. Using the tray that comes with the oven and a silpat layer (or a heat resistant craft sheet) arrange 5 beads touching each other like petals. Place in oven and allow to melt - approx 20 min. You can open the oven part way through to push the beads if they are not touching each other using a metal spatula or I used the ends of my tweezers. Removed from heat and IMMEDIATELY press a half pearl in the centers, pushing down. You'll feel some resistance which is good, probably means it's attaching itself to the inner side edges of the flower. If there is really a lot of resistance, put the beads back in the oven to warm up again.

Tie some little bows and adhere between flowers.

On the inside, stamped the quote using the black. Stamp the flower (Rubbernecker "Blossom") inking stamp with Distress "Broken China" & "Seedless Preserves" & green for the stems, misting with water and stamping.

Flower bauble detail pic


 Please use your back button for previous pages or should you wish to go to the Misc Challenges 2015 Gallery please click on

or to go to the previous Misc Challenges Card Gallery click HERE

or  And More Gallery for hand made greeting cards please click the link below.

More Cards Gallery

 
Home Page Index
(text only)
Glass
Gallery
"And More"
Gallery