|
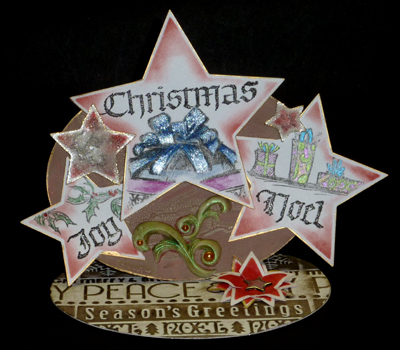
I started by die cutting my stars
(Spellbinders Nestabilities Stars 5 #S4-092) from white cardstock.
Stamped various Flourishes Xmas stamps (All Wrapped Up #45;
Christmas Tea #73; Let Them Eat Cake #89) using the die as a
stencil, then sponged Distress Fired Brick around the edges. Colored
them with Derwent Inktense, Prisma colors and Sakura Metallic gel
pens. Added some Winsor & Newton Iridescent medium to the large blue
bow. On the 2 smallest stars I coated it with Glossy Accents and
then sprinkled clear glass beads - I probably put on too thick a
layer - C'est la vie. I edged each star with Krylon gold leafing
pen. Stamped the words with Versafine Black Onyx and clear embossed
only the words. I die cut the
oval easel card with a Spellbinders Ovals Grand set, put one edge
shy of the die so it wouldn't be cut off from white cardstock. I cut
2 more ovals the same size for the floor and the front.
The one for the floor, I put through
my machine with the Cuttlebug "Seasons Greetings" folder #37-1931.
Since the width of the oval was larger than the folder, I placed my
folder on either side of the already embossed area, lining up the
words and used my hard rubber mallet to emboss the design. I used a
direct to paper over the high points with Distress Pumice Stone, and
clear embossed it. I die cut 3 smaller stars, sponged with the red,
slit down between each star point to create petal type shapes and
curled them. Edged the lowest one with the gold leaf pen and
attached all three with a silver star brad attaching it to the floor
as well, then adhere the floor to the main card.
The other oval I painted with
Distress Crackle medium (Frayed Burlap), allowed to dry, then
smeared Aged Mahogany all over and wiped off excess. PS, my crackle
mediums seem to dry out all the time, so I add water, mix well and
they definitely still work... and they're easier to apply since it's
a thinner mixture.
Adhered my stars both direct to the
oval and some with pop dots. Adhered the oval to the front of the
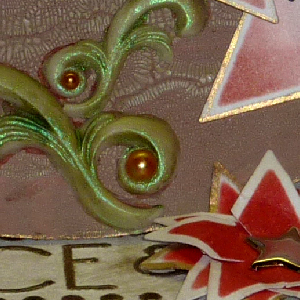
card. Adhered the flourish ornaments, which were made from Air Dry
Polymer clay and painted with Perfect Pearls, with Golden's Extra
heavy gel medium. |

 |