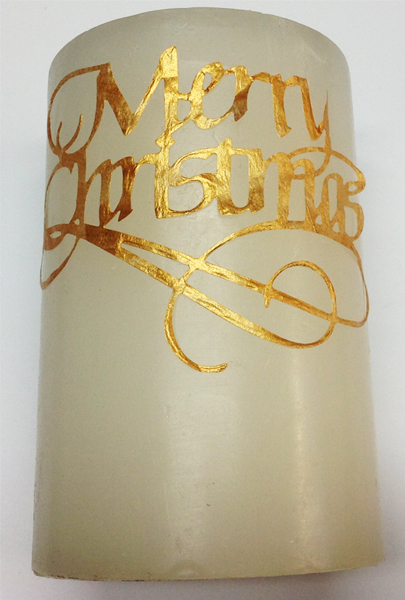
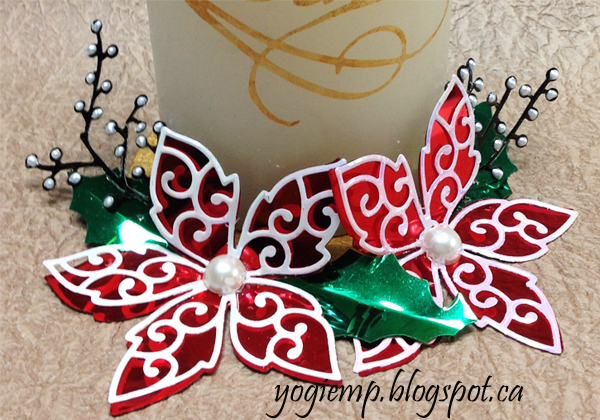
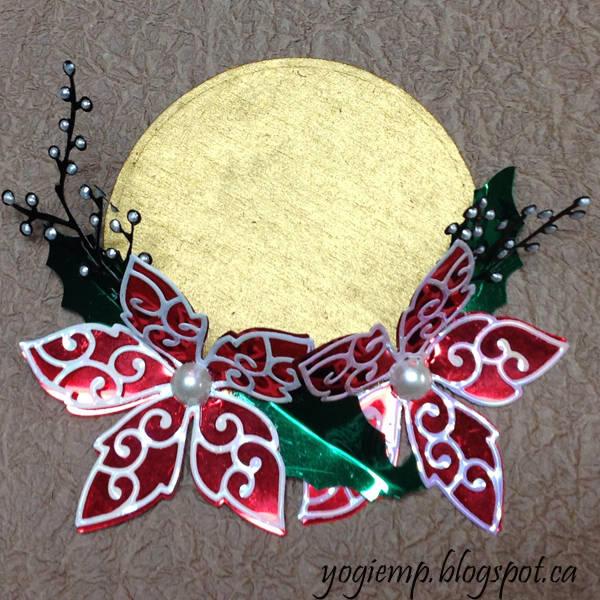
ID: ECD Poinsettia Candle Holder - Dec 2015

Created: November 16, 2015
Modified:

I don't do very much for Christmas anymore except cards... but since I am a guest on the ELizabeth Craft Designs blog I thought I'd make something a little different than my norm...

The die, "Merry Christmas" designed by Suzanne Cannon can also be purchased from Quietfire Design.  


Step 1: cut a piece of tissue paper and copy paper  a little larger than the size of your die.

Paint one side of the tissue paper with the Deco Art Dazzling Metallics "Emperor's Gold" acrylic paint (or paint of choice)

Step 2: (Note - I'm using a layer of copy paper to protect my tissue paper.) The sandwich, with the cut edge of your die facing up, copy paper, tissue paper - painted side down (facing the die) and the rest of your machine's cutting surfaces. PS I ALWAYS use a metal adapter plate to help with cutting, but also to keep my acrylic plates pristine...

Remove from die, while still layered, remove negative pieces, then carefully separate the tissue from the copy paper.


Step 3: Create a cradle to hold your candle steady from a piece of copy paper with the ends rolled toward the center, then just place your candle with the cradle.

I use Ranger's Heat It gun because it has less wind so my tissue paper doesn't blow away...

Position the tissue paper word and while holding it down, start heating a small area of the candle. You will start to get a glossy wet look. Stop heating and use the spatula, gently press the tissue into the melted wax. It will cool rapidly so you need to work quickly.

Once this first section is adhered with the wax, the rest goes real easy. Do small areas at a time until all adhered.


Step 4: Cut a piece of heavy box type cardboard (or chipboard) a little larger than your largest circle die - at least an 1" larger than your pillar candle. Die cut with your machine. It will not cut through, but will give you a good guiding cut line to continue the cut with your x-acto knife.

Paint the surface and edges with the gold paint.


Step 
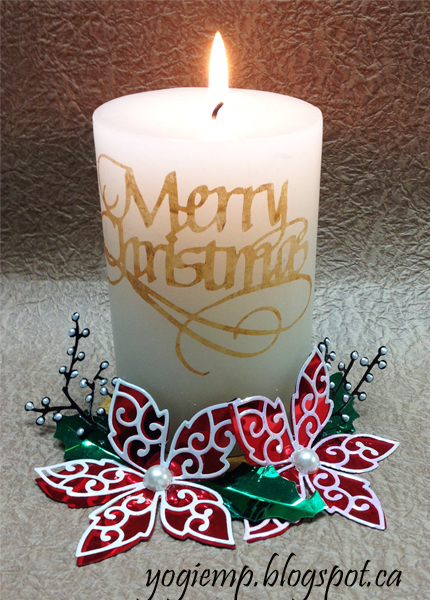
5: Die cut your various Shimmer Sheetz elements. Two solid Poinsettia pieces from red, two pink Iris filigree pieces, 3 green holly leaves, 2 bronze metallic berry branches.

Place the filigree onto the solid poinsettia base matching the petal shapes and while holding both together, fold down 2 of the petals above the center dots. The Shimmer Sheetz hold the fold nicely. The side view should look like a right angle. Place a drop of hot glue onto the dot area of the solid base the size of a pea, then press the filigree piece down. The glue will seep through the little holes and create a nice bond.

Place a line of hot glue about an inch long, along the outer edge of the circle and press the poinsettia down to adhere.

Repeat with 2nd poinsettia.

Fold the leaves in the vein area. Put a dot of hot glue onto one end and place leaves strategically as shown.

Cut the berry branch into 2 smaller pieces. Put a drop of hot glue on the end of the berry branch (careful it softens the branch but when cooled will be stiff again), and place on either end.

Put drops of Liquid Pearls "White Opal" onto the berry protrusions.


Return to Crafts Gallery or to Glitter Gallery or  to  NittyGritty  Gallery


Home Page Index
(text only)
Glass
Gallery
"And More"
Gallery